Wednesday, December 20, 2023

2023 Wonders of the Hubble Telescope Stitch-a-long by Climbing Goat Designs


I usually pick some sort of project at the beginning of each year that is a multi-month design. Sometimes it is a quilt-a-long, somethings a crochet or knit-a-long, sometimes just a longer project that looks interesting. This year I decided to make Climbing Goat Design's Wonders of the Hubble Space Telescope for my wife. She loves NASA and space related things, and there is a sadly bare wall above her desk that this design would be perfect for.


Part 1 of Climbing Goat’s Wonders of the Hubble Space Telescope stitch-along is done (Completed 01/26/23). It’s of the planetary nebula NGC 2818. I am looking forward to seeing what the next image will be.


Part 2 - Galaxy NGC 6217. Finished this past weekend (Completed 3/4/23). This square had a lot of pale grays and blues that were harder to tell apart as I stitched, so I tried to do some of the brighter colors first to act as a visual guide. Smaller and more subtle that the first design, but with a bit more trickiness.


Part 3 - The Engraved Hourglass Nebula. I just finished part 3 tonight (Completed 4/14/23). I really like the figure 8 shape with the ”eye” in the middle. The vibrancy of the reds and oranges is nice too. It reminds me of Lord of the Rings. This month’s frame had a solid black background. I didn’t totally like that it didn’t match the prior two frames, so I added a few background stars to mine.


Part 4 - NGC 602 Star Cluster and Nebula. Part 4 was just finished today (Completed 6/3/23). I think it might be my favorite so far. I love all the pinks and purples and the way the star bursts stand out against the swirl of the nebula.


Part 5 - Whirlpool Galaxy (Completed 9/2/23). This one has taken the longest of any of the frames to finish. Part of it was that there were so many shades of similar browns and creams and grays. There were a lot of recounts just to be sure because I wasn’t positive what that next color should be. Another part of the slowdown was because my carpal tunnel and tendinitis has been glaring up, so I have had to pace myself to avoid the pain getting unmanageable. I think the final results are very nice though. The black really makes the swirl pop.


Part 6 - Helix Nebula (Completed 9/6/23). This little square seemed like a breeze in comparison to the last one. Smaller, fewer and more condensed colors. Very vibrant to look at too, which is always fun.


Part 7 - Antennae Galaxies (Completed 9/12/23). I made a big departure with this design. I wasn’t super keen on the interpretation the original designer took for this cluster of galaxies.

The image to the right is the original stitch-out designed for the stitch-a-long. There is nothing wrong with it. It's a good design. It was just a bit too one note in color, and the proportion seemed off to me. A little blobby. It also didn't match many of the Hubble photos we found of the reference galaxy either. My wife agreed and asked if I'd be able to make a new design more like some of the other photos we had seen of the Antennae Galaxies.


So I used some online software to convert a photo of the Antennae Galaxies to a pattern in the same dimensions as the original frame we stitched before part one. The image to the left is a side by side view of the final stitch-out beside the web image of the galaxy that I used for reference to create the design. Really, really happy with how it turned out. The salmon color had me questioning my choices for a while, but I think all the colors work together in the end.


Part 8 - V838 Monocerotis (Completed on 12/19/23). I had paused my work on the stitch-a-long
because I was working on Yule and Christmas gifts for friends and family. I'm just now getting back to it. This stitch-out went really quickly. It only took two days to complete. The design isn't super exciting, but it's pretty and goes well with the other designs. I am still not sold on the star bursts as a design element, but the bursts on this design balance out the bursts on the fourth design placed on the opposite side. I like the symmetry of it.


Part 9 - Center Section Hubble Telescope. My wife and I are still debating if we should go with the designed image for this middle section or switch it up for something different. As designed, it is the Hubble Telescope in orbit with the curve of the earth beneath it. It's not a bad design. Pretty realistic. We'll likely stick with this for the center section, but we've also been debating perhaps replacing it with a NASA symbol or a different version of just the telescope. Neither of us like the writing that part 9 tacks onto the bottom of the design. We both prefer that the design stay square in orientation rather than rectangle. I am thinking I will move the names of the pictured items into the center section or have them go around the outside edge of the design if spacing is correct for that. We'll see.

Update: I decided not to stitch the stars in the background because my fabric already has stars on it that look good on their own. I ordered some framing supplies that are on their way. Soon this will be on the wall behind my wife’s desk.


FINISHED! Below is the finished Wonders of the Hubble Telescope Stitch-a-long by Climbing Goat Designs. I ordered the custom double mat from a seller on Etsy and acid free mounting board from Amazon. The frame came from either Target or Walmart. My wife and I are both really happy with the way the finished piece turned out. It will go above her desk in our office.


Friday, December 1, 2023

2023 Advent Calendar Adventures

We always get together with our friends for a joint Yule and Christmas celebration. We hang out in our pj's or other comfy clothes, have a potluck of soups or order take-out, and exchange gifts with each other. We try to make the holiday as low stress as possible because we all know how stressful family get-togethers during the holidays can be. No one wants to add to that.

This year for our gifts, my wife had the idea to make each person an advent calendar. She actually brought the idea to me last year, but at that time, we didn't have enough time to pull it all together. So, we reserved the idea for this year keeping in mind that all calendars needed to be completed before Thanksgiving in order to be able to gift them to everyone before the start of December.

Let me just begin with, we had no idea what we were getting into.

We spent a couple of months looking for design ideas for each of our friends that suited them specifically. I found a lot of the patterns/instructions on Etsy and was able to purchase the cut files for my Silhouette Cameo. I was not well versed in using the paper cutting machine at the start, and now I am extremely experienced with it. Once the patterns were decided on, there came the task of finding suitable decorative papers and cardstocks for each project. It was fun but also a big task. It took a while to sort.

Then, the cutting and construction began...


1) Baldur's Gate III Video Game Sleeve Advent Calendar

The first advent calendar we started on was a Baldur's Gate III inspired calendar made to look like the game packaging from the outside and like a bookshelf on the inside filled with books holding each advent item. They each had titles of books actually found in the video game itself. The larger drawers at the bottom are supposed to represent the crates you can smash for loot in the game, and I 3D printed a potion bottle dice holder to represent the urns and vases that are often on the bookshelves and in the rooms.


2) Baldur's Gate III Double Library Advent Calendar

We also made an expanded version of the Baldur's Gate III themed advent calendar that looked like a wardrobe cabinet from the outside and revealed a library within full of books from the video game.


3) Bag of Holding Advent Calendar

We made a Bag of Holding Advent Calendar by making boxes in the shapes of polyhedral dice (used when playing Dungeons and Dragons and other D20 based role play games. The recipient also crochets, so we found a nice craft bag to use as the holder for the advent dice.


4) Princess Castle
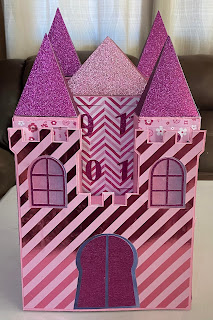
For our friends daughter, we made a pink princess castle. The hardest part about this one was finding fun kid items that fit in the tiny boxes. I was particularly pleased with the pack of scrapbook papers I found in all shades and patterns of pink.


5) Beer Barrel Advent Calendar

A lot of our advent items and calendars were themed toward gaming things. We have one friend who does not game, but he does like to spend quite a bit of free time in the summer at our local Renaissance Faire. And he likes to bake. We combined those two things and printed and painted a cookie jar in the shape of a wooden barrel to be the calendar storage. We wrapped individual advent items and placed them inside.


6) Water Dragon Advent Calendar

Another friend really loves dragons and I found a pattern for a super cute dragon advent calendar on Etsy. She also (as dragons do) loves sparkly things, so I chose glitter scrapbook paper in various shades of blue and green for the dragon scales. I giggle every time I look at his dragon face. It's probably my favorite of the calendars.


7) Witchy Library Advent Calendar

One of our friends shares my interests in both gaming and metaphysical things. She also, like my wife and I both, has a love of reading and books. I made her a wardrobe library similar to what I mentioned above except I chose mystical and witch related scrapbook papers to decorate the books so that they looked like old leather bound mystical tomes I really loved the papers I was able to find for hers. She has pet snakes, and I was even able to find some with a snakeskin pattern and others with a drawing of the snake.


8 and 9) Medieval Castle Advent Calendars 

For two of our other friends, we made medieval style castles (one red, one blue). D8 (8 sided dice) boxes held each day's advent items. I put 1 inch grids on the castle ramparts and in the center section of the castles so they could actually be used with miniatures to play D&D.


Tuesday, August 6, 2019

Adventures in Quilting - 2018-2019 Block of the Month Club - June 2019 - Block 12


Quilter's Haven 2018-2019 Block of the Month Club - June 2019
Sew Simple Northern Lights Sampler
One Star Burst Block


The last square was the hardest. Looking at the photo, it doesn't look like it would be that hard. I swear it shouldn't be. I cut out all my pieces. I read through the instructions at least a dozen times. I used my Google-Fu magick to try to find a video illustrating this particular Star Burst block (unsuccessfully). No matter how I turned the pieces, it just wasn't coming out right. I was a stumped.  While searching Google for videos, I happened upon a video for a similar but not as elongated version of the center starburst. The block is called a Sawtooth Star block. The video I found was by Alex Anderson and Ricky Tims from The Quilt Show. They used a really nifty reverse technique to complete the design so that there was less cutting and sewing of individual triangles. It reminds me a lot of how you use Thangles but different in execution. You can watch the video on their YouTube channel here.

It's not exactly like the original, but I thought it gave the same overall design element. I did follow the dimensions given in the video, so the finished central square ended up smaller than what I needed for the finished block to equal our standard 15 1/2 inches. To solve this problem, I added a border around the edge of the center block before adding my trim pieces. I was using small scraps, so I had to really piece areas to be able to complete the design, but I do not think it turned out badly at all. I was so mad at this piece that I was afraid I'd never like it. In the end, I think this square is one of my favorites. I look at it and smile because it reminds me of the Funshine Bear Care Bear that I had as a kid.

I know once I have someone show me how to do the technique for the elongated points on the original inside star, it will all make sense. Until then, I say screw that. I am happy with how this one ended up.

Adventures in Quilting - 2018-2019 Block of the Month Club - May 2019 - Block 11


Quilter's Haven 2018-2019 Block of the Month Club - May 2019
Sew Simple Northern Lights Sampler
One Hour Glass Block
Two Geese Blocks


We are nearing the home stretch ... so close to finishing all of the individual blocks! I really like the design of this month's larger block, and I like how the color turned out against my lighter background better than the way it looked against the black. It was so ORANGE, but now it is softer. The design was pretty easy and used techniques that we have already incorporated into other blocks. Easy-peasy!

The small blocks is where the trouble came in. I The green one turned out okay over all, but the second dark magenta block was a thorn in my side! I took it apart at least four times because every time one piece just didn't line up. So frustrating. I measured the seams. I measured the pieces. Everything measured out correct, but for some reason I just could not sew this piece correctly. 

I ended up setting it aside for a month before I came back to it. As I was about to start my fifth go-round, I also decided that I'd rather change the color to the brighter pink with purple flecks that we used for the nine-patch blocks. This one is still not lined up perfectly, but I decided I am either just going to have to live with it or I am going to have to do a different block for this one. I hung it on my wall, and I am going to look at it for a while to see how much it bugs me every I walk by it. If it irks me too much, I will change it to a different block. If not, I am putting it in as-is.


Monday, July 29, 2019

Adventures in Quilting - 2018-2019 Block of the Month Club - April 2019 - Block 10


Quilter's Haven 2018-2019 Block of the Month Club - April 2019
Sew Simple Northern Lights Sampler
One Boxed In Block
Two Stop Blocks


I thought this month's block was very interesting. It has a much different look than all of the other blocks we have completed so far. I like the crisp lines of the inside diamond, and I like that it is formed with the lighter background fabric. The marbled dark and light blue and turquoise of the batik that is used for the rest of the design is really pretty as well. I has so many dimensions in the color swirls. I would be very happy with a whole quilt or wall hanging made using this sort of block design.

The construction was very simple as well.


The small blocks mirror the shape used for the January large block. I am glad we now have multiple blocks with a rounded design. I was a bit worried that we had one circular pattern thrown into a quilt filled with angular, pointed shapes. I think this will balance that out very nicely.

I do not love the orangey red color of the one block, but it matches one of the earlier larger blocks. I'm guessing it will look better once it is all put together. 

We were given one sheet detailing the first part of assembly, but I think I am going to hold off on the assembly instructions until all of the blocks are completed. 

Three more months!

Adventures in Quilting - 2018-2019 Block of the Month Club - March 2019 - Block 9


Quilter's Haven 2018-2019 Block of the Month Club - March 2019
Sew Simple Northern Lights Sampler
One Around the Block Block
Three Tic-Tac-Toe Blocks


March's blocks were really enjoyable to make. The larger green block was very similar to the block we did in December. I also very much like how the green pops against the cream colored background fabric. I hope we use this color again for one or two of the smaller blocks.

All of the points matched up the way they were suppose to, and that is always a relief and bonus to the process.
The two small blocks for this month were made from a pattern called Tic-Tac-Toe. Looking at the finished blocks, I'm not sure what inspired the name. It doesn't particularly remind me of anything to do with a tic-tac-toe game. No X's or O's or shape of the board. So, yeah, not sure. It for some reason reminds me of a basket.

I liked both of the colors we used, and the squares were really easy to put together. No problems to report. And it is March! Only four months left.

Friday, July 26, 2019

Adventures in Quilting - 2018-2019 Block of the Month Club - February 2019 - Block 8


Quilter's Haven 2018-2019 Block of the Month Club - February 2019
Sew Simple Northern Lights Sampler
One Flocks of Geese Block
Two Bow Tie Blocks

This month definitely upped the challenge rating for sure! Flying Geese ... so many flying geese. I've never used this particular pattern, and they were a bit tricky for me. 

I have since found a much easier way to make the flying geese sets. Alex Anderson and Ricky Tim from The Quilt Show demonstrate a super easy way to form the design in their tutorial for a Sawtooth Star Block (found here). I will for sure use their method next time this technique is called for. As you can see in the picture, I also sewed one set of corner triangles pointing in the wrong direction. I haven't quite decided which direction I like better. The pattern calls for the orange triangles to point toward the corners (as they are on the bottom half of the block), but I do kinda like the break in color that having them point toward the inside gives the design. I will have to decide which side to fix before I assemble, but for now I will leave it as-is.


The small blocks are called Bow Tie Blocks. They were really simple to put together. Luckily no problems there. I kind of saw them as my reward for making it through the large block this month. I had earned something fast and simple for these little blocks.