Tuesday, August 6, 2019

Adventures in Quilting - 2018-2019 Block of the Month Club - June 2019 - Block 12


Quilter's Haven 2018-2019 Block of the Month Club - June 2019
Sew Simple Northern Lights Sampler
One Star Burst Block


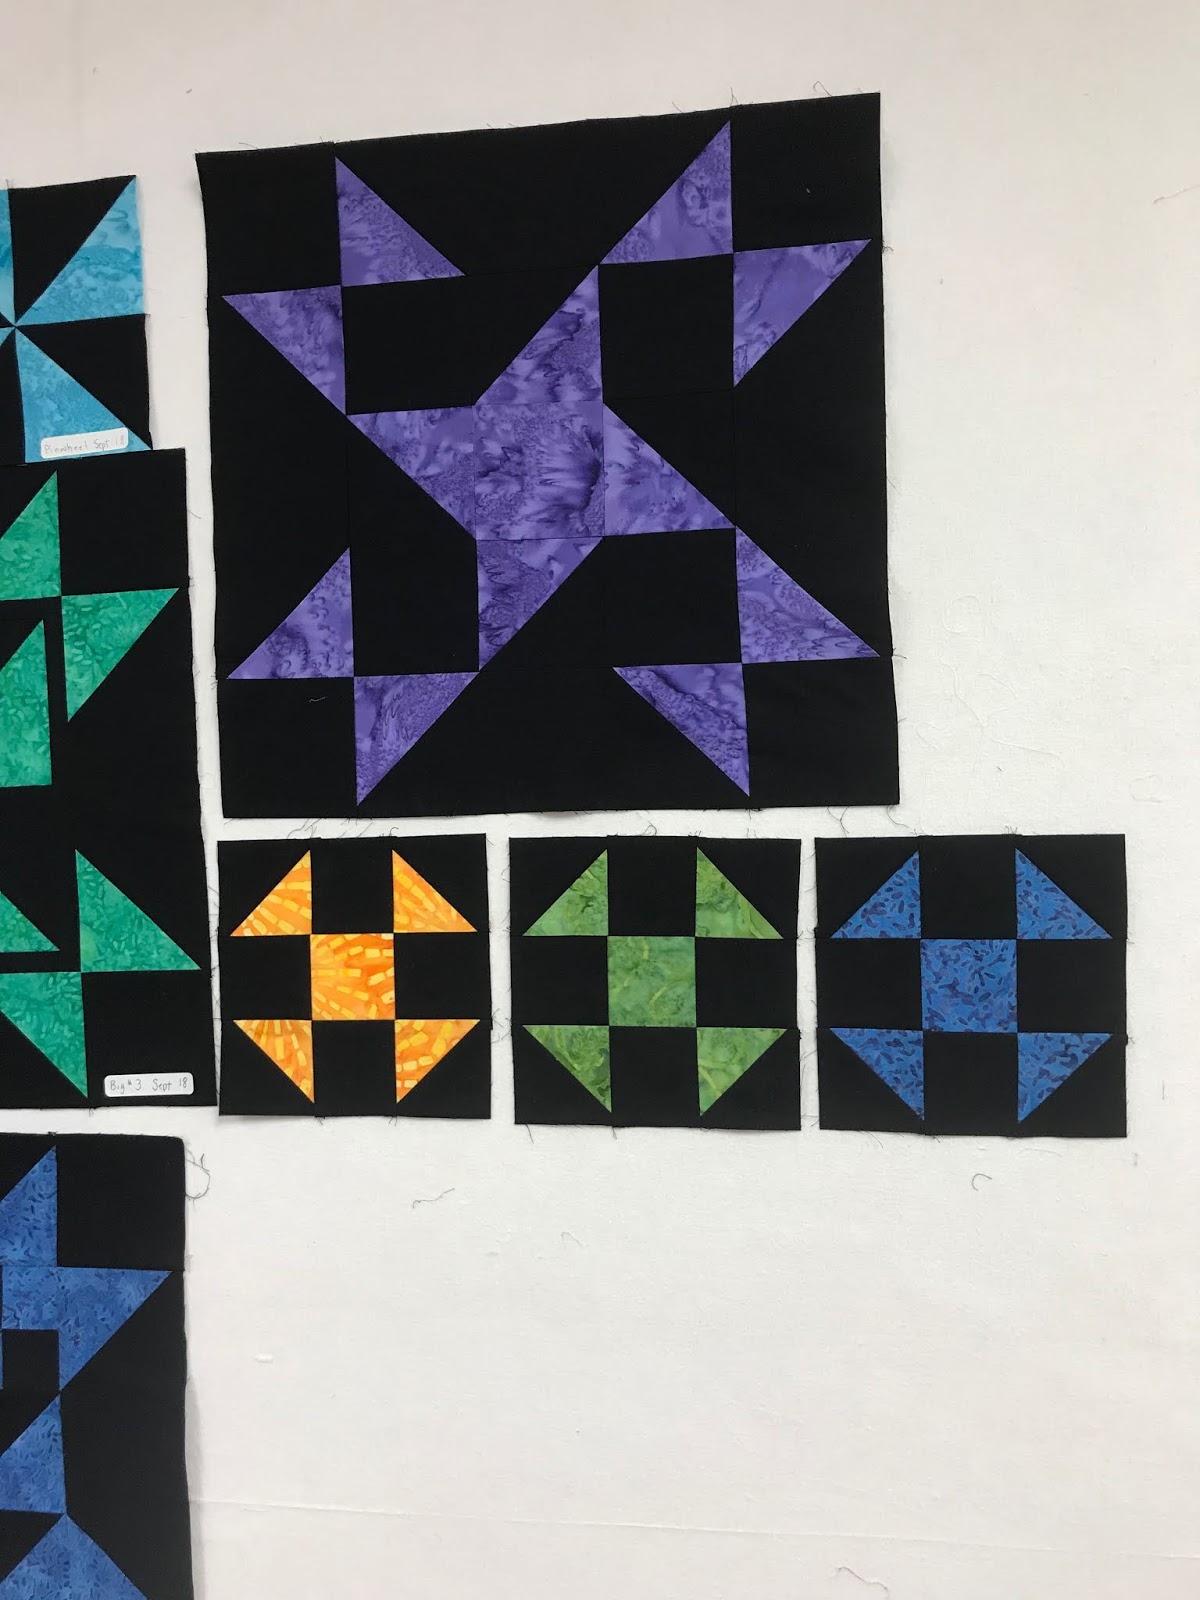
The last square was the hardest. Looking at the photo, it doesn't look like it would be that hard. I swear it shouldn't be. I cut out all my pieces. I read through the instructions at least a dozen times. I used my Google-Fu magick to try to find a video illustrating this particular Star Burst block (unsuccessfully). No matter how I turned the pieces, it just wasn't coming out right. I was a stumped.  While searching Google for videos, I happened upon a video for a similar but not as elongated version of the center starburst. The block is called a Sawtooth Star block. The video I found was by Alex Anderson and Ricky Tims from The Quilt Show. They used a really nifty reverse technique to complete the design so that there was less cutting and sewing of individual triangles. It reminds me a lot of how you use Thangles but different in execution. You can watch the video on their YouTube channel here.

It's not exactly like the original, but I thought it gave the same overall design element. I did follow the dimensions given in the video, so the finished central square ended up smaller than what I needed for the finished block to equal our standard 15 1/2 inches. To solve this problem, I added a border around the edge of the center block before adding my trim pieces. I was using small scraps, so I had to really piece areas to be able to complete the design, but I do not think it turned out badly at all. I was so mad at this piece that I was afraid I'd never like it. In the end, I think this square is one of my favorites. I look at it and smile because it reminds me of the Funshine Bear Care Bear that I had as a kid.

I know once I have someone show me how to do the technique for the elongated points on the original inside star, it will all make sense. Until then, I say screw that. I am happy with how this one ended up.

Adventures in Quilting - 2018-2019 Block of the Month Club - May 2019 - Block 11


Quilter's Haven 2018-2019 Block of the Month Club - May 2019
Sew Simple Northern Lights Sampler
One Hour Glass Block
Two Geese Blocks


We are nearing the home stretch ... so close to finishing all of the individual blocks! I really like the design of this month's larger block, and I like how the color turned out against my lighter background better than the way it looked against the black. It was so ORANGE, but now it is softer. The design was pretty easy and used techniques that we have already incorporated into other blocks. Easy-peasy!

The small blocks is where the trouble came in. I The green one turned out okay over all, but the second dark magenta block was a thorn in my side! I took it apart at least four times because every time one piece just didn't line up. So frustrating. I measured the seams. I measured the pieces. Everything measured out correct, but for some reason I just could not sew this piece correctly. 

I ended up setting it aside for a month before I came back to it. As I was about to start my fifth go-round, I also decided that I'd rather change the color to the brighter pink with purple flecks that we used for the nine-patch blocks. This one is still not lined up perfectly, but I decided I am either just going to have to live with it or I am going to have to do a different block for this one. I hung it on my wall, and I am going to look at it for a while to see how much it bugs me every I walk by it. If it irks me too much, I will change it to a different block. If not, I am putting it in as-is.


Monday, July 29, 2019

Adventures in Quilting - 2018-2019 Block of the Month Club - April 2019 - Block 10


Quilter's Haven 2018-2019 Block of the Month Club - April 2019
Sew Simple Northern Lights Sampler
One Boxed In Block
Two Stop Blocks


I thought this month's block was very interesting. It has a much different look than all of the other blocks we have completed so far. I like the crisp lines of the inside diamond, and I like that it is formed with the lighter background fabric. The marbled dark and light blue and turquoise of the batik that is used for the rest of the design is really pretty as well. I has so many dimensions in the color swirls. I would be very happy with a whole quilt or wall hanging made using this sort of block design.

The construction was very simple as well.


The small blocks mirror the shape used for the January large block. I am glad we now have multiple blocks with a rounded design. I was a bit worried that we had one circular pattern thrown into a quilt filled with angular, pointed shapes. I think this will balance that out very nicely.

I do not love the orangey red color of the one block, but it matches one of the earlier larger blocks. I'm guessing it will look better once it is all put together. 

We were given one sheet detailing the first part of assembly, but I think I am going to hold off on the assembly instructions until all of the blocks are completed. 

Three more months!

Adventures in Quilting - 2018-2019 Block of the Month Club - March 2019 - Block 9


Quilter's Haven 2018-2019 Block of the Month Club - March 2019
Sew Simple Northern Lights Sampler
One Around the Block Block
Three Tic-Tac-Toe Blocks


March's blocks were really enjoyable to make. The larger green block was very similar to the block we did in December. I also very much like how the green pops against the cream colored background fabric. I hope we use this color again for one or two of the smaller blocks.

All of the points matched up the way they were suppose to, and that is always a relief and bonus to the process.
The two small blocks for this month were made from a pattern called Tic-Tac-Toe. Looking at the finished blocks, I'm not sure what inspired the name. It doesn't particularly remind me of anything to do with a tic-tac-toe game. No X's or O's or shape of the board. So, yeah, not sure. It for some reason reminds me of a basket.

I liked both of the colors we used, and the squares were really easy to put together. No problems to report. And it is March! Only four months left.

Friday, July 26, 2019

Adventures in Quilting - 2018-2019 Block of the Month Club - February 2019 - Block 8


Quilter's Haven 2018-2019 Block of the Month Club - February 2019
Sew Simple Northern Lights Sampler
One Flocks of Geese Block
Two Bow Tie Blocks

This month definitely upped the challenge rating for sure! Flying Geese ... so many flying geese. I've never used this particular pattern, and they were a bit tricky for me. 

I have since found a much easier way to make the flying geese sets. Alex Anderson and Ricky Tim from The Quilt Show demonstrate a super easy way to form the design in their tutorial for a Sawtooth Star Block (found here). I will for sure use their method next time this technique is called for. As you can see in the picture, I also sewed one set of corner triangles pointing in the wrong direction. I haven't quite decided which direction I like better. The pattern calls for the orange triangles to point toward the corners (as they are on the bottom half of the block), but I do kinda like the break in color that having them point toward the inside gives the design. I will have to decide which side to fix before I assemble, but for now I will leave it as-is.


The small blocks are called Bow Tie Blocks. They were really simple to put together. Luckily no problems there. I kind of saw them as my reward for making it through the large block this month. I had earned something fast and simple for these little blocks.

Adventures in Quilting - 2018-2019 Block of the Month Club - January 2019 - Block 7


Quilter's Haven 2018-2019 Block of the Month Club - January 2019
Sew Simple Northern Lights Sampler
One Stop Block
Two 9 Patch Blocks


Another month down! And another month where I am really happy with how the large and small blocks turned out. The dark wine color of the larger block is really rich and striking. The octagon shape was super easy to piece as well. 

The small blocks this month repeated the 9 patch pattern that was used last month. We were all a bit surprised that there was a second pink block made. So far, we haven't repeated a block in the same exact color and design as a previous block. I'm not sure where exactly these are intended to go on the finished quilt. That pink is my favorite of the colors we have used so far, so more is okay with me. The instructor isn't fond of the color, so I am not sure how much more we will get of it.

Adventures in Quilting - 2018-2019 Block of the Month Club - December 2018 - Block 6


Quilter's Haven 2018-2019 Block of the Month Club - December 2018
Sew Simple Northern Lights Sampler
One Spinning Pinwheel Block
Two 9 Patch Blocks

December's blocks were a breeze! I'm finally getting the hang of this. I didn't have to take any of them apart to reset a square or fix a corner. That is a great feeling. I am starting to feel like I am not so horrible at this. 

I really like how the pale blue looks against the background fabric. I also LOVE the pink that we used this month for one of the nine patch smaller squares. I hope we end up using more of this color. It's a great vibrant pink batik with flecks of dark purple. It really brings out the tiny hot pink polka dots on the background fabric. I like the orange as well. It is really soft and brings to mind orange creamsicle floats. I think overall the three colors used this month look really great next to each other. 

I am not completely sold on the design of the center of the block, but I think it will be okay once the whole quilt is assembled. Along, depending on the angle, it reminds me of a swastika, and I'm not thrilled about that. From other angles, it makes me think of a child's pinwheel toy or a wind mill. I'm trying to train my eye not to see the first one. 

I'm a little nervous about the bright red square we did during our second month of the BOM. That one just seems very harsh when looking at it next to the other squares we have done so far.

We will see though. I do not know what other colors are being added in as we go, so I am sure it will all work out to something harmonious. I mean, at worse, if I do not like it at the end I can always remake the block in a different color. 


Thursday, July 25, 2019

Adventures in Quilting - 2018-2019 Block of the Month Club - November 2018 - Block 5


Quilter's Haven 2018-2019 Block of the Month Club - November 2018
Sew Simple Northern Lights Sampler
One Friendship Star Block
Three Shoe Fly Blocks

Friendship Star Block
The November blocks went pretty smoothly. No major hiccups. I had already learned the technique for creating the pinwheel centerpiece on the large block when I made the trio of smaller blocks last month. That really was the hardest part. I like how rich the purple looks against the cream background.

I am beginning to see the benefit of using a dark background with the blocks because on the samples it always looks as if the brightly colored shapes are floating on a solid sea of black. That's a really nice affect. I can't quite achieve that using the lighter background because you can see all of the seam lines so much clearer. That's okay though. I think overall I am still going to be much happier with the finished product that I end up versus if I had made it on a black or dark gray.

Those border pieces that are repeated on all of the 15 1/2 inch blocks are getting easier. They were sort of the bane of my project the first couple of months. Now I seem to have that part down so that they turn out right the first time instead of the third or fourth time around.

Shoe Fly Blocks
This month we also completed three of the 6 1/2 inch blocks. The design on those were pretty simple as well. No problems to report. The green one is a bit weird. It's an odd shade of olive green with little gold flecks. We aren't going to be using that color anywhere else in the quilt, and I just find it a bit muted and drab beside all of the other brighter colors. If I dislike it too much by the end, I may switch it for a different color. I have a bag of scraps I have been keeping for my border and any last minute changes.

Thursday, April 25, 2019

Christmas / Yule 2018: Who Needs to Buy Presents When You Can Make Them? - Part 2

Part 2 of this tale is everything else I made while taking little breaks from working on Darth Vader (because my eyes can only take so much black thread ... don't laugh ... when you see the other projects, you'll understand).

I made a wolf silhouette skyline piece for our friend, Chris. I know he likes wolves, and we live in Minnesota. The night-time winter skyline called to me.

I actually started on this one before DV. I hadn't done any cross-stitch in years, and I wanted a smaller project to start with. It is not super complex, but I think the simplicity really is part of its beauty. I love how it turned out, and I wouldn't want to change anything about it. I am particularly pleased with the matting choice. I think the bright cobalt blue really makes the blues in the stitching pop. Clean, simple, beautiful.


The next item isn't technically a Yule gift, but I wanted to include it here. And it's my blog ... so I am. Two of our friends, Cass and Torrey, moved into a new house, and we finally got to go visit them at
the end of the summer. I wanted to make something special for them, and they are both big fans of Zelda. That's what inspired me to do this piece. I so wanted to do one of the big map pieces, but I was afraid to jump into a project that large with a shorter timeline. I have never cross-stitched any word art before, but I would definitely do another in this style.

Framing and matting was the hardest decision for this piece. I knew right away I wanted to do a simple, black poster-style frame. I have used a similar frame on several of my artwork pieces, and I really like that it doesn't compete with the art. I wanted the outer mat to a charcoal gray or a little lighter to bring out some of the variations of silver and gray in the weapon and shield. I just couldn't find an inner mat that I really liked. It also looked kind of squashed. I decided to play with it and cut out two vertical mat pieces to create the borders on the right and left sides. I think it turned out nicely. I like how it accentuates the length of the cross-stitch piece and brings out the lighter grays/silvers in the stitch-work. Cass and Torrey both seemed to like it, so that made me very happy.

The next piece is NOT a cross-stitch. My friend Tami loves the Disney Villains, especially Ursula, so I wanted to make her something featuring the villains we all love to hate (or hate to love?). It's cold and blustery here a lot of the time. I wanted to make her something cozy that would be just for her. No blanket or shareable. One of the pattern groups I am a member of (Stitch Upon a Time) posted a hooded poncho pattern last fall, and I fell in love with it for this project. It has POCKETS! I wanted it to be warm but not too warm, so I opted for cotton on the outside and polar fleece on the inside. I scouted out the fabric selection that Joann's released around Halloween and kept an eye on it hoping against hope that it wouldn't disappear before Black Friday. And it didn't! They still had one bolt of the villains print that I had in mind when I went shopping on Black Friday. So, I snagged it along with some lime green fleece and set to work. To the left is Tami modeling it because I forgot to snag a picture before gifting it for Yule. Doesn't it look great?! I just love it.

The last item was for my wife. Steffie very rarely asks for anything handmade, so when she does, I
make sure to make it a priority. When I was first learning to knit, she asked for a hat like one her mom made for her as a kid. Her requirement was that it be able to stand up on its own. I think I almost broke my fingers knitting that hat (and did break a few knitting needles during the process). She loves it though and wears it on puppy walks during the winter. It keeps her head nice and toasty even when it's windy.

I was showing her some fun crocheted items on Pinterest right around the holidays, and we saw a fun Grinch scarf that she really liked. She wanted it winter colors (white, blue, silver) instead of red so that it would not be as Christmasy. I couldn't find the pattern anywhere. I found out later the creator had to pull it because of copyright issues even though she was offering it for free. I looked at a lot of pictures, went and bought some yarn, and thought, what the heck ... I'd give it a try on my own. I'd never done any C2C (corner to corner) crocheting before, which is what the original pattern was. I watched about ten YouTube videos on how to do it and set to work. Once I got the hang of how the C2C worked, it went really quickly. I found some free snowflake patterns on the Red Heart yarn site and added those to break up the blue. Getting the eyebrows and eyes just right were probably the hardest part. I am very happy with how the finished piece turned out, and it looks so nice with her hat that stands up.


Thursday, April 11, 2019

Christmas / Yule 2018: Who Needs to Buy Presents When You Can Make Them? - Part 1

For Christmas / Yule 2018, I decided I was not going to buy any holiday presents this year. I was going to make all of the presents myself. Before you go all, "Girl, what were you thinking?!" ... I did start making the items in April because I knew it would take quite a bit of time for at least two of the presents. 

I made a Darth Vader wall hanging for one friend, a landscape wolf wall hanging for another friend, and a Disney Villains hooded cape for another friends. I also took a couple breaks during the summer to make another friend a Zelda themed house warming present and to start up a block of the month quilting project.

I am almost done with all of the darkest blue sections.
The Death Star looks like it has a boob.
The Darth Vader project was definitely the most challenging and rewarding of the group. I bought the cross-stitch pattern Needlework #002-10 on Etsy from StitchLine. I decided to stitch it out on a light gray Aida fabric I bought from JoAnn's. There were only about seven colors in the pattern, and almost all of them were shades of dark blue, gray, and black. 

Early on, I was pretty sure my eye-sight would never be the same. With the colors being so close to the same shade, it was easy to  miscount. I cannot tell you the amount of times I had to take out stitches because I was one square over from where I should be. I kept at it though, and things started to come along.

I was so sad that my hoop size was just shy of the full width of the cross-stitch pattern. Before I do another this size, I want to purchase one of the scroll type holders for the fabric so that I do not have to re-hoop and also so that it does not leave hoop marks on my fabric.

I started with the green and light gray shades and slowly worked into the dark grays, blues, and black. The black is the last color I did because it allowed me to mostly just fill in without any sort of counting at that point. I spent a couple of hours a night, maybe three days a week working on it from May until November. I spent so much time
So close to being done with this section.
Just filling in the black.
working on it that last week that the muscles in my hand started cramping any time I tried to hold something smaller than a fat marker. My hands ached and my wrist hurt. I ended up using a compression wrap to finally get it to not be painful.

The fabric looked kinda dingy when it was all done, so I consulted one of the local framing shops on how best to clean the fabric gently. The owner said she always used dove soap, so that's what I did. It did get out the unfortunate Dr Pepper stain and cleaned the general hand grime that always ends up on a project that takes this long to complete. 

Unfortunately, the process that fixed the stains caused the green thread to bleed. I have made at least a dozen wall hangings, and I have never had something like this happen with one before. I always use name brand thread and am careful about using only cold water. It looked like a small creature had peed on the fabric. After some research, I made a fast dash to the craft store for some Carbona Color Run Remover and followed the directions exactly to *cross fingers* remove the color bleeds. When I pulled the fabric out of the chemical solution, the whole design was dark chocolate brown. I was on the verge of the panic attack and a blind rage all at once but something made me decide to rinse it out as the instructions said to anyway. As the cold water washed over it, the colors slowly started to show through. The brown disappeared after about five minutes of rinsing. The flood of relief was real. I was almost crying. That product should REALLY warn you that is going to happen.

I got it dried, ironed out the wrinkles, and ordered a nice frame and mat set  for it since the framing store wanted way more than I could afford to invest this year. I think the finished product turned out quite beautiful, and my friend seemed to really like it. That was the most important part, and it made the aches, pains, and almost tears completely worth it.